How to Install a Tile Roof: Complete 7-Step Guide for 2025
Maintenance & Repair
Tile Roofing Installation
October 13,2025
How to Install a Tile Roof: Complete 7-Step Guide for 2025
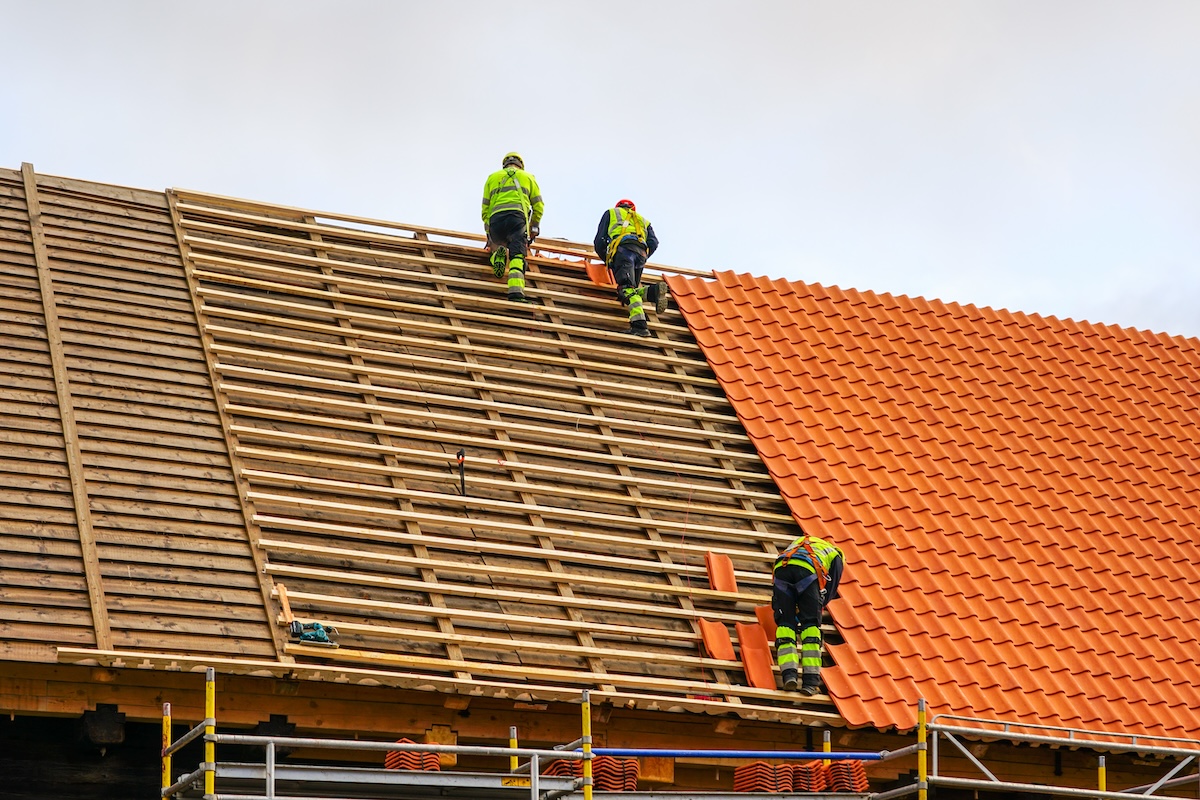
Alt text: Professional roofers installing tile roofing on a residential home, showing the installation process with workers carefully placing tiles
Choosing a tile roof means investing in lasting beauty and protection for your home. If you are wondering how the installation process works, you are in the right place. This guide walks you through the complete tile roof installation process in seven straightforward steps.
Whether you are exploring clay tile roof options or considering concrete alternatives, understanding the installation process helps you make informed decisions and know what to expect from your roofing contractor.
Understanding tile roof installation basics
Before any tiles touch your roof, contractors must verify your home can support the weight. Tile roofing weighs significantly more than asphalt shingles. A typical concrete tile roof adds 8 to 12 pounds per square foot, while clay tiles add 6 to 10 pounds per square foot.
Your contractor will inspect the roof deck structure, looking for any damage or weakness that needs repair before installation begins. This step protects your investment by ensuring a solid foundation.
| Tile Type | Weight per Sq Ft | Typical Lifespan | Best Climate |
|---|---|---|---|
| Clay | 6-10 lbs | 50-100 years | Hot, dry |
| Concrete | 8-12 lbs | 40-75 years | Variable |
| Composite | 4-8 lbs | 30-50 years | Most climates |
The differences between tile types affect both installation approach and long-term performance.
Quick insight: Professional tile roof installation typically takes 5 to 7 days for an average-sized home, depending on roof complexity and weather conditions.
The 7-step tile roof installation process
Step 1: Roof deck inspection and preparation
Contractors thoroughly examine your existing roof structure. They check for rot, weak spots, or damage that could compromise the new roof. Any problems get fixed now, not after tiles are installed.
The deck must be clean, dry, and level. Contractors remove old roofing materials and make necessary repairs to ensure a smooth, stable surface.
Step 2: Installing protective underlayment
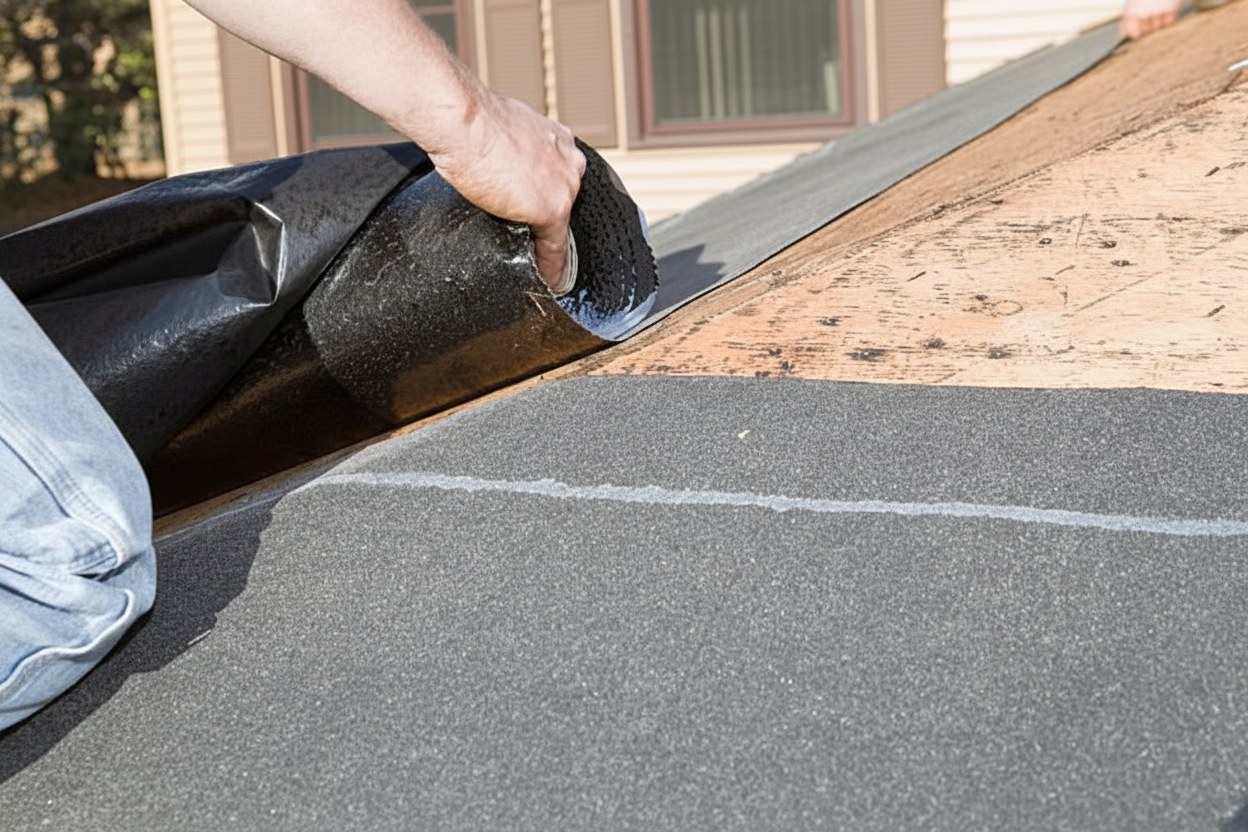
Alt text: Roofing contractor preparing roof deck with underlayment before tile installation, showing proper preparation steps
Underlayment creates a critical waterproof barrier between your roof deck and tiles. Contractors roll out the material starting at the eaves and working upward. Each row overlaps the previous one by at least 6 inches.
Important note: Quality underlayment prevents water damage even if tiles crack or shift. This layer is your roof’s first line of defense against leaks.
Modern tile roof underlayment options include synthetic materials that outperform traditional felt paper in durability and water resistance.
Step 3: Planning tile layout and marking
Proper planning prevents costly mistakes. Contractors measure and mark guideline
s across the roof to ensure straight rows and proper tile spacing.
They account for:
– Roof dimensions and slope
– Tile size and overlap requirements
– Architectural features like valleys and hips
– Ventilation and penetration points
This planning phase ensures tiles align correctly and the finished roof looks professional.
Step 4: Installing the tiles row by row
Installation begins at the bottom edge with starter tiles. Contractors work upward, following the marked guidelines. Each tile overlaps the one below, creating a water-shedding pattern.
Tiles attach using nails, clips, or adhesive depending on the tile type and local building codes. Proper fastening is critical in areas with high winds. Many regions require specific attachment methods to meet wind resistance standards.
Step 5: Adding ridge and hip caps
Ridge and hip tiles cover the peaks where roof planes meet. These specialized pieces get custom-fitted and secured with extra attention to weatherproofing.
Contractors seal these vulnerable areas carefully because water naturally flows toward ridges and hips. Proper installation here prevents the most common leak points on tile roofs.
Step 6: Installing flashing around penetrations
Flashing creates watertight seals around chimneys, vents, skylights, and other roof penetrations. Contractors cut and shape metal flashing to fit each opening precisely.
They seal flashing edges with roofing cement, creating a barrier that directs water away from vulnerable spots. This step requires skill and attention to detail. Poor flashing causes most tile roof leaks.
Watch for damage around flashing areas and address issues quickly to prevent water intrusion.
Step 7: Final inspection and cleanup
Contractors inspect the completed installation, checking that all tiles sit properly and fasteners are secure. They verify flashing is sealed and ridges are weathertight.
The crew cleans up debris, removes equipment, and ensures your property looks immaculate. A final walkthrough with you confirms everything meets expectations.
Maintaining your new tile roof
Your new tile roof should provide decades of protection with minimal maintenance. Schedule annual inspections to catch small issues before they become expensive problems.
Regular cleaning removes debris and prevents moss or algae growth. When walking on your roof for maintenance, follow proper techniques to avoid cracking tiles.
Tile roofs typically last 40 to 100 years depending on material type and climate conditions, helping you plan for long-term home maintenance and budget accordingly.
Frequently asked questions about tile roof installation
How long does tile roof installation take?
Can I install a tile roof myself?
What makes tile roofs more expensive than shingles?
